How to use OBS Virtual Camera in Zoom, Microsoft Teams, and Google Meet
Learn how to use OBS Virtual Camera in Zoom, Microsoft Teams, and Google Meet, then add your iPhone or multiple cameras to OBS Studio.
OBS Virtual Camera turns the scene you build in OBS Studio into a webcam that Zoom, Microsoft Teams, Google Meet, and other video apps can use.
The short version is:
- Build your scene in OBS Studio.
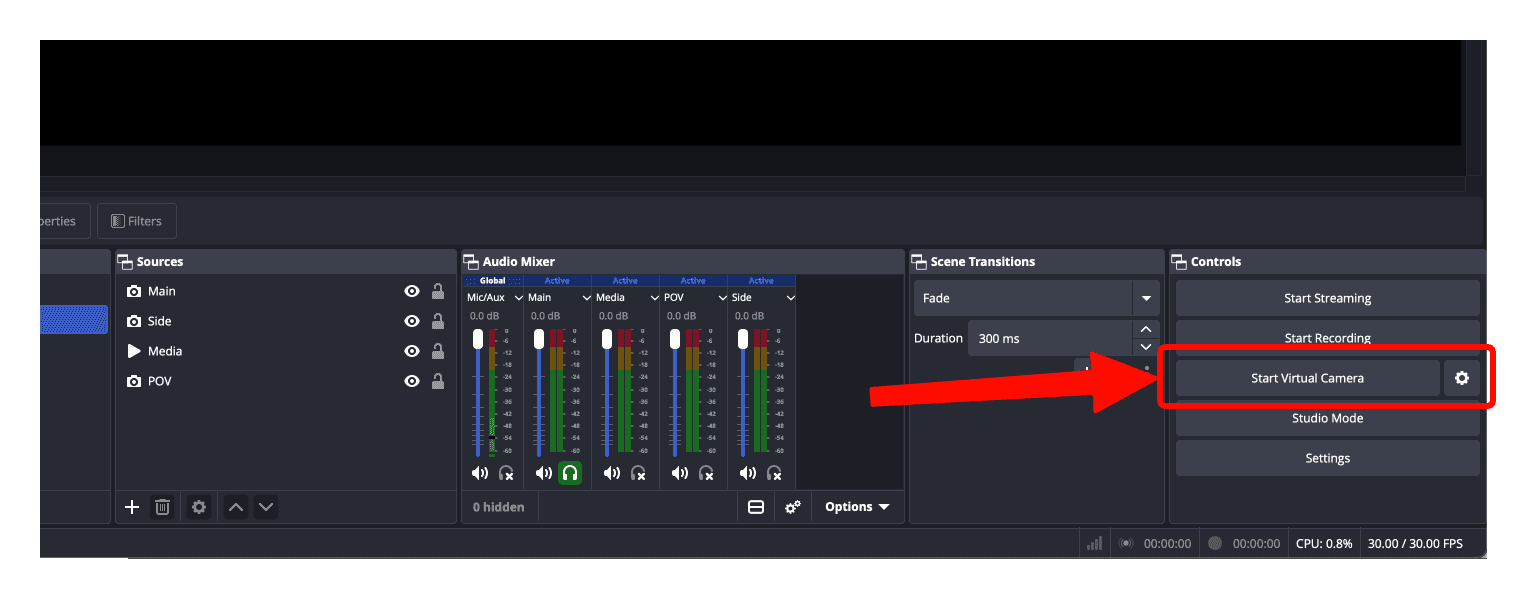
- Select Start Virtual Camera in the OBS Controls dock.
- Open the camera settings in your meeting app.
- Choose OBS Virtual Camera instead of your usual webcam.
You do not need to start a stream or recording. Leave OBS open, and anything you put in the selected OBS output becomes your camera feed: a webcam, screen, slides, lower thirds, picture-in-picture, or several camera angles.
What does OBS Virtual Camera do?
A normal webcam sends one camera image straight to a video call. OBS Virtual Camera puts OBS in the middle:
Camera and other sources → OBS scene → OBS Virtual Camera → Zoom, Teams, or Meet
The meeting app sees one camera named OBS Virtual Camera. It does not need to understand OBS scenes or sources. You can change scenes in OBS during the call, and the other app continues receiving the same virtual webcam.
This makes the feature useful for online lessons, presentations, podcasts, remote interviews, demonstrations, and any call where one fixed webcam is not enough.
It is probably more setup than you need for an ordinary one-camera call. A normal webcam or Continuity Camera is simpler when you only want a picture of your face. OBS earns its place when you want to combine sources, add graphics, or switch between complete layouts while you are live.
How to set up OBS Virtual Camera
1. Build the scene you want people to see
Open OBS Studio and add your camera, display, window, image, or other sources. Arrange them in the preview exactly as you want them to appear in the call.
For a simple setup, one full-screen camera is enough. You can add overlays or picture-in-picture later, once the basic path is working.
2. Choose what the virtual camera sends
Select the gear beside Virtual Camera in the OBS Controls dock. For most people, Program is the right output: it sends the same finished scene that OBS would normally record or stream.
OBS can also send a particular preview, scene, or source. Those options are useful when you want to work elsewhere in OBS without changing what people in the call see.
3. Start the virtual camera
Select Start Virtual Camera in the Controls dock. The button changes to Stop Virtual Camera while it is running.
4. Select it in the other app
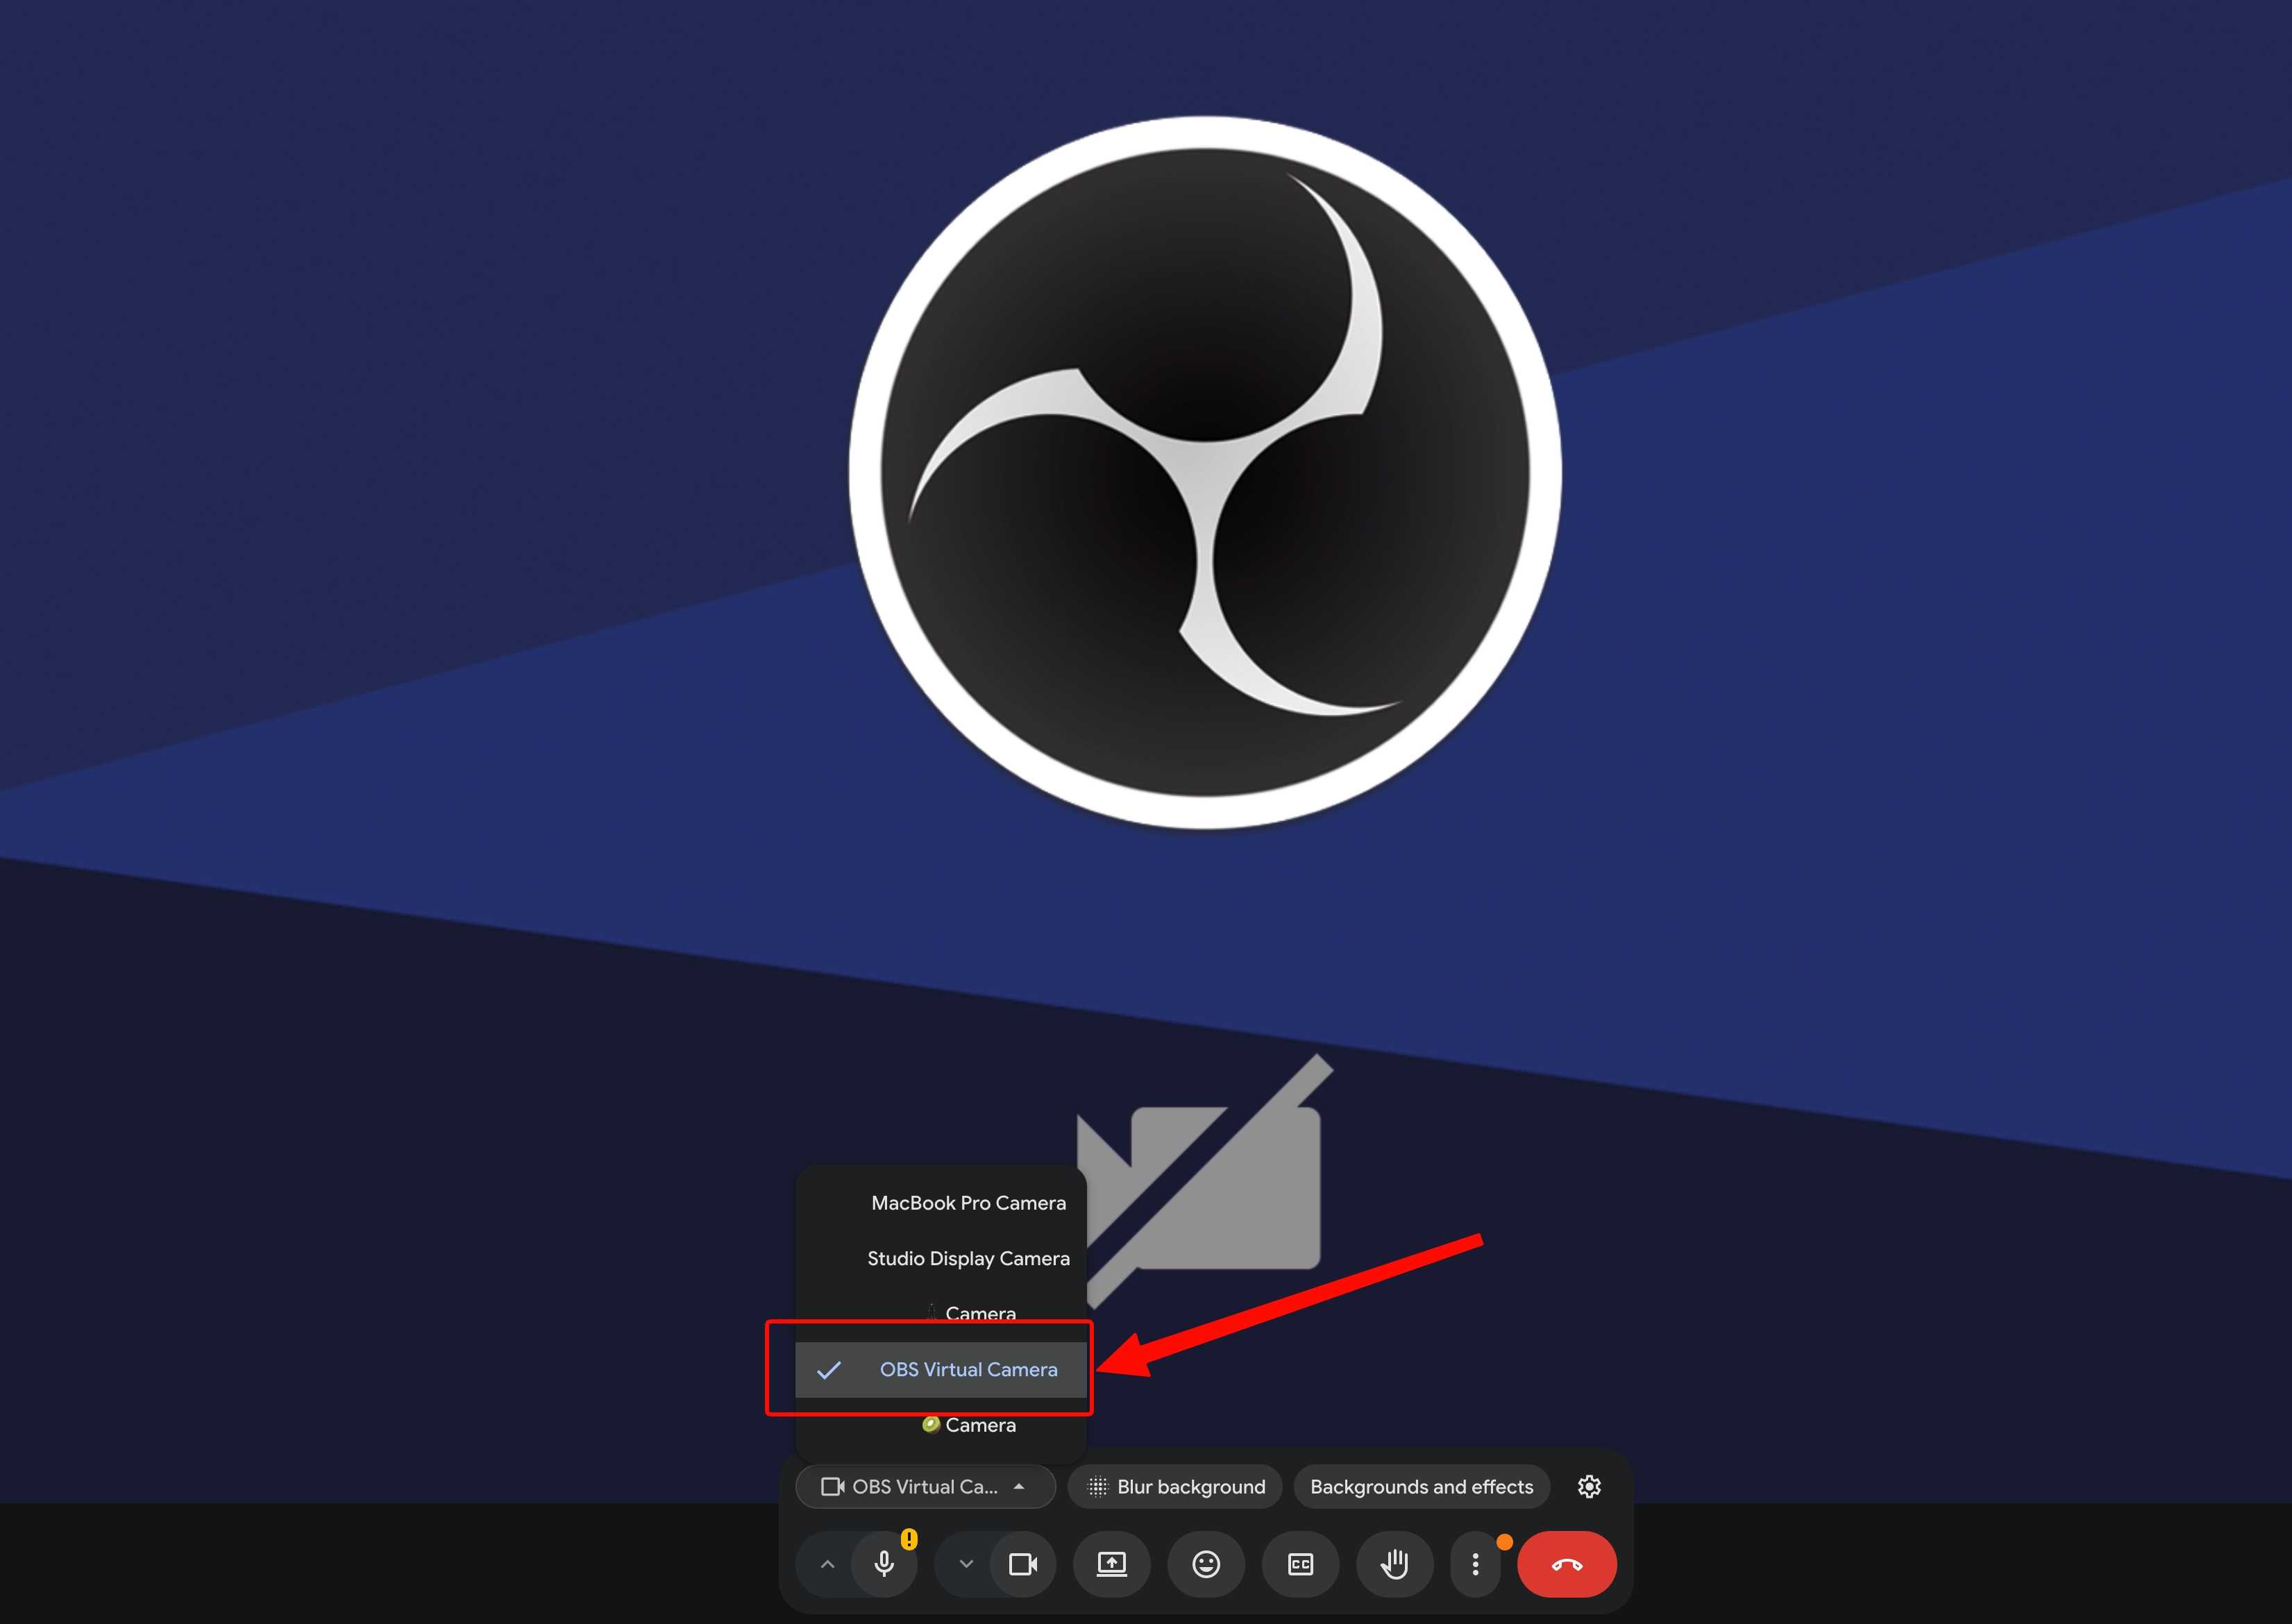
Open the camera menu in Zoom, Teams, Meet, or another video app and choose OBS Virtual Camera. You should now see the OBS output in that app's camera preview.
If the meeting app was already open and the camera is missing, fully quit and reopen it after starting the virtual camera.
Use OBS Virtual Camera in Zoom
During a Zoom meeting:
- Select the arrow beside Video.
- Open Video settings.
- Choose OBS Virtual Camera from the Camera menu.
Before a meeting, you can make the same choice under Settings → Video & effects. Check the preview before joining an important call.
Use OBS Virtual Camera in Microsoft Teams
Before a Teams meeting:
- Select Settings and more.
- Open Settings → Devices.
- Under the video settings, open the Camera menu.
- Choose OBS Virtual Camera.
Teams should show the OBS scene in its preview. You can also change the camera from the meeting's video settings after you join.
Use OBS Virtual Camera in Google Meet
From the Google Meet preview screen, open the camera selector and choose OBS Virtual Camera.
If you are already in a meeting:
- Select the arrow beside the camera button, or open More options → Settings.
- Open Video.
- Choose OBS Virtual Camera from the Camera menu.
Your browser needs permission to use cameras. If OBS Virtual Camera does not
appear, check the camera permission for meet.google.com, then reload the
page.
Use OBS Virtual Camera in other apps
The same setup works in any desktop or browser app that accepts a standard webcam. Look for a setting named Camera, Video device, or Webcam, then choose OBS Virtual Camera.
Start the virtual camera before you open the other app. Some apps build their device list only when they launch.
Audio is a separate setting
OBS Virtual Camera is the video path. In Zoom, Teams, or Meet, choose the microphone you want people to hear as a separate audio input.
For an ordinary call, the simplest setup is to select your normal microphone or headset directly in the meeting app. If you need the complete OBS audio mix instead, you also need a virtual audio device and some extra routing. The official OBS video-call guide explains that more advanced setup.
Put your iPhone camera into the OBS feed
OBS Virtual Camera controls how video leaves OBS. You still get to choose what goes into the scene.
A built-in webcam will work, but an iPhone can give you a better image and a camera you can place away from the computer. That is what my app, Camera for OBS Studio, is for. It is an unaffiliated third-party app that turns an iPhone or iPad into a camera source inside OBS Studio.
The basic USB setup is:
- Install the Camera for OBS Studio plugin on your Mac or Windows PC.
- Install and open Camera for OBS Studio on the iPhone.
- Add an iOS Camera source to your OBS scene.
- Connect the phone over a USB data cable and select it in the source.
- Start OBS Virtual Camera and choose it in Zoom, Teams, or Meet.
The complete iPhone USB setup guide walks through the plugin and connection steps. USB is my default recommendation because it avoids Wi-Fi congestion and charges the phone while it works. When a cable cannot reach, the app can also send video over NDI and Wi-Fi.
Use multiple cameras in the same call
The useful part of putting OBS between your cameras and the meeting app is that Zoom or Teams does not need to support a multicamera setup. OBS handles it.
Run Camera for OBS Studio on two or three iPhones, add each one as a separate iOS Camera source, and make scenes such as:
- Wide for the whole room.
- Close for your face or the person speaking.
- Top for a desk, instrument, product, or demonstration.
- Grid for two or more angles at once.
Switch scenes in OBS while the call continues to use OBS Virtual Camera. The other participants see the cut immediately, but their app still sees only one webcam.
Each additional camera gives the computer another video stream to decode and compose. The practical limit depends on the computer, connection, resolution, and frame rate. Start modestly and test the whole setup before a long call.
The multiple-iPhone OBS guide covers cables, powered hubs, scene hotkeys, sync, and performance for longer sessions.
If OBS Virtual Camera is not working
OBS Virtual Camera is not showing up
- Start the virtual camera in OBS before opening the receiving app.
- Fully quit and reopen Zoom, Teams, or the browser after starting it.
- Update OBS Studio and the receiving app.
- On macOS, make sure the OBS camera extension is allowed in System Settings.
- On Linux, make sure
v4l2loopbackis installed.
The official OBS troubleshooting guide has the current platform-specific installation steps.
The virtual camera shows a black screen
- Confirm that the OBS preview itself contains a visible picture.
- Check that the eye icon beside the camera source is on.
- Open the Virtual Camera settings and select Program.
- Stop and restart the virtual camera, then reopen the receiving app.
If the iPhone source is black inside OBS too, fix that connection first. The virtual camera can only send the picture OBS is receiving.
The wrong scene appears
Open the Virtual Camera settings from the gear in the Controls dock. Choose Program if you want the virtual camera to follow your live scene changes. A fixed Scene or Source selection will keep sending that item even when you switch elsewhere in OBS.
The image is cropped or has black bars
Check the aspect ratio of the OBS canvas and the sources inside it. Right-click a source and use Transform → Fit to Screen if it is not filling the canvas as intended. The meeting app may crop its self-view or participant tile, so also check what another participant sees before changing the OBS layout.
There is video but no sound
Choose your microphone in the receiving app. OBS Virtual Camera does not turn the OBS audio mix into a meeting microphone by itself.
Do I need a separate virtual-camera plugin?
No, not with a current OBS Studio installation on Windows or macOS. Virtual
Camera is built in. Linux uses v4l2loopback, and the official troubleshooting
guide covers platform-specific installation if the button is missing.
The short checklist
- Make sure the scene looks right in OBS.
- Set the Virtual Camera output to Program.
- Select Start Virtual Camera.
- Choose OBS Virtual Camera in Zoom, Teams, Meet, or another app.
- Choose your microphone separately.
Once that works, you can replace the laptop webcam with an iPhone, then add more angles without changing anything in the meeting app. If that is the setup you want, try Camera for OBS Studio and start with one phone over USB.