Controls
Let's dive into all the available controls in the app, hopefully it will allow you to get the most out of OBS Camera.
General Controls
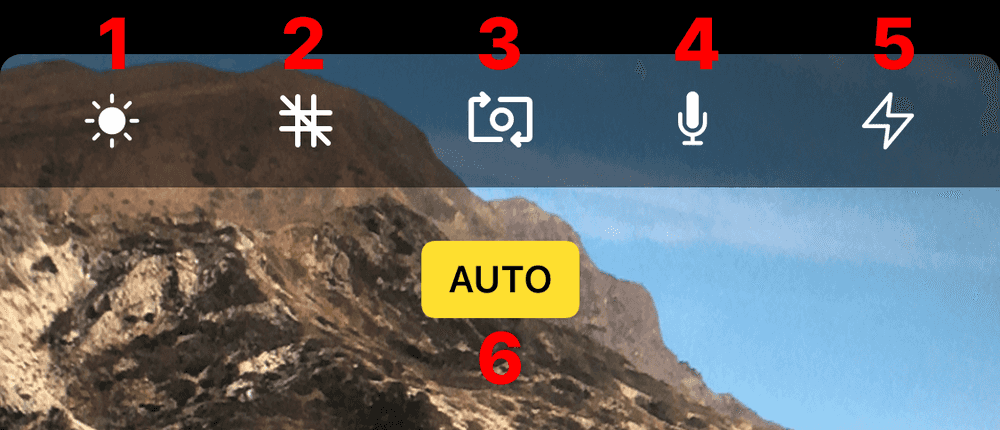
Let's start with the top row dedicated to general controls.
- Screen Brightness: Allows you to blank out the devices screen. Useful if you want to reduce the power usage, or prevent extra lighting in your scene.
- Alignment Grid: Display the alignment grid to create a better composition.
- Camera: Quickly switch between the front and back camera.
- Microphone: Toggle the microphone ON or OFF.
- Torch: Toggle the torch. Useful if you need extra lighting for your scene.
- Auto: The current camera mode, either Automatic or Manual. In automatic mode iOS will try to get the best picture for the current conditions. Manual is the opposite, and applies when you are overriding the camera settings.
Camera Controls
Let's move to the bottom of the screen dedicated to the camera settings.
When you are using a Dual / Triple cameras, iOS will switch to the best available camera lens for the current configuration. Zooming in and out will automatically switch lens to the best suited for the current settings. That's why when using Dual / Triple cameras some of the settings are not available. Each camera has different manual capabilities, which is why some of the manual controls change depending on the selected lens.
- Zoom: Control the zoom of the camera
- EV: Exposure Value (EV) is a way to combine shutter speed and aperture into a single value. If you are wondering what exposure value to use for your scene we recommend the chart on wikipedia.
- ISO: ISO sensitivity is a measure of the camera's ability to capture light. As you increase your ISO number, your photos will grow progressively brighter. ISO can help you capture images in darker environments. Going to high in the ISO might create an image with noise. That's why it is recommended to use the shutter speed first to brighten your photo.
- S: S stands for Shutter Speed. In photography, shutter speed is the length of time when the film or digital sensor inside the camera is exposed to light. The amount of light that reaches the film or image sensor is proportional to the exposure time. Shutter speed is responsible for two particular things: changing the brightness of your photo and creating dramatic effects by either freezing action or blurring motion.
- Focus: Changes the lens position to focus on a specific depth. You can enable focus peaking in the setting to get a visual preview of which areas of the image are sharpest.
- WB: White Balance changes what the camera considers "white". In photography you adjust the which balance to make the image look more natural in difficult lighting situations. A good way to get it right is to make sure an object which appears white in person is white in your photo. A sheet of white A4 paper is a good test subject.
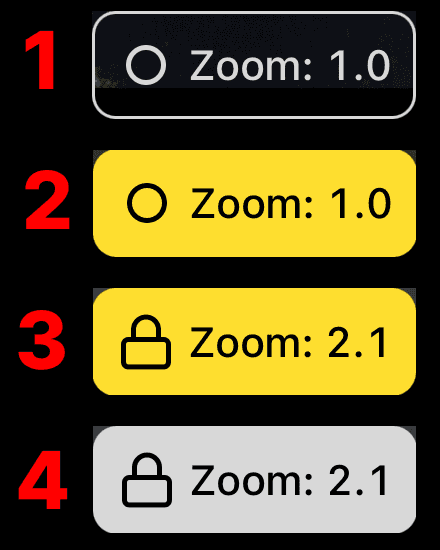
Button States
- Default: This is the default state of the button when no modification has been applied and the value isn't locked.
- Selected: When you select a parameter the button will turn yellow to indicate its selected.
- Selected & Locked: The parameter is selected and the value has been modified. The value will not change in the future and will stay as set.
- Unselected & Locked: When the parameter is unselected and the value has been modified. The value will not change in the future and will stay as set.
Autofocus
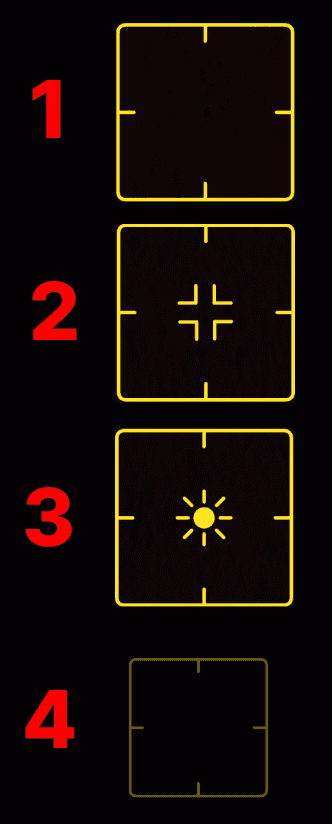
When there is no crosshair iOS will automatically attempt to focus on what seems to be the point of interest in the scene.
- Tapped: When the default focus doesn't give you the wanted result. Tap the screen to indicate the specific area you want in focus.
- Focus with Exposure: This is the crosshair allowing you to set a specific point in focus.
- Exposure: The exposure crosshair allows you to set the point of ideal exposure within your scene. When you have a sharp difference of light within your scene you can set the reference point for the base exposure.
- Locked Focus: Long press the crosshair to lock the focus. No matter what happens in the scene the focus will be locked at this specific value.


